|
I
will take for granted that you have installed WorldCraft
to your system and have launched it.
[Zoners
Half-Life tools
have good documentation. Just pop the files into a subfolder
in your WorldCraft directory].
Normally the first time you launch WorldCraft, you will
see this…

Larger
Image
If
you have never touched a CAD program before then your
brain might be saying… Oh…
My… God… How many bloody options?
It
really is all logical stuff. You will soon pick it up
if you intend to become a hardcore mapper!
I
find that when teaching people, if you give a person
an explanation as to how it works and not just what
it does then you get a lot further.
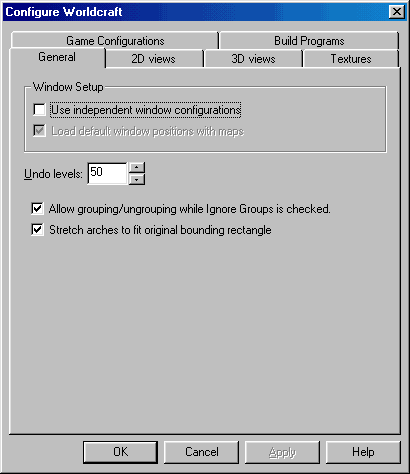
The
General Options Tab
- [Back
to Contents]
The
way you see the following pictures is exactly how I
would like you to setup your WorldCraft options unless
I state otherwise.

Larger
Image
The
area outlined with the red ellipse is what we call a
TAB. This tab as
you can see it is the General TAB.
1.
Use Independent
Window Configurations:
In WorldCraft you have a 4-pained window representing
a map. If this option is ticked then WorldCraft will use
independent window configurations.
This means that you can define the way your windows and
pains are arranged in WorldCraft and load different configurations
at any time. This is extremely handy for people with small
monitors; it works well for anyone though! Leave it unchecked
for now. We will look at this aspect later.
2. Load Default Windows Positions
With Maps:
This will load your default window configurations with
a specific map. Only applicable when option 1 is ticked.
3. Undo
Levels:
This is the amount of Undo
Levels you have.
So if you created an object and the modified it you can
undo your changes up to 50 times at default. Unless you
have more that 128 MEG RAM leave the figure alone. If
you get lots of 'Lack of Memory' messages then lower the
figure.
4. Allow
Grouping/Ungrouping While 'Igrore Groups' Is Checked:
If you group a selection of objects within WorldCraft.
This option allows you to modify the group when the 'Ignore
Groups' option is enabled.
So if you had 5 objects grouped and you wanted to add
or subtract objects from the group you would normally
have to ungroup the objects first. When this option is
ticked you don't have to ungroup things to modify the
group.
5. Stretch
Arches To Fit Original Bounding Rectangle:
Upon outlining an area with which you want to create
an arch. If you want the arch to stretch to the size of
the area tick this option.
The
2D Options Tab
- [Back
to Contents]

Larger
Image
Crosshair
Cursor:
When this is enabled, the pointer
will turn into a crosshair when it is over a brush.
Default
To 15-Degree Rotations:
When rotating a brush, the rotations
will automatically be in 15-degree increments. Untick
this for free rotation.
Display
Scrollbars:
Display scrollbars works as
a toggle, letting you turn scrollbars on and off in
the 2D views. When scrollbars
are turned off, with the mouse cursor over a 2D window
hold down Space and drag with the mouse to scroll around
the 2D view.
Draw
Vertices:
If this is enabled, brush vertices
will be shown in the 3D views.
White
On Black Colour Scheme:
Brushes will appear as white
lines drawn on a black background. When this is not
enabled, the reverse is in effect.
Keep
Grouping When Clone Dragging:
Select this feature when clone
dragging [selecting an
object, holding down shift, and dragging the object],
if you want the newly cloned object to retain grouping
properties of the original object.
Centre
On Camera After Movement In 3D:
Use this option if while using
the mouse to move around the 3D view while in camera
mode, you want the 2D views to automatically centre
on the new camera position.
Use
Visgroup Colours For Object Lines:
When this is enabled, the object
lines for any non-entity brush will be the colour specified
in its Visgroup when viewed in the 2D views. Objects
not associated with a Visgroup will still appear white.
Arrow
Keys Nudge Selected Object/Vertex:
When this is enabled, you can
move a selected object or vertex by using the arrow
keys. Note that the mouse
cursor's position in the 2D views will dictate which
direction the object will move.
Reorient
Primitives On Creation In The Active 2D View:
When this is enabled, primitives
will be oriented with their "top"
shown in whichever 2D view it was created. This is most
easily shown when creating a cylinder. With this option
disabled, the cylinder will be oriented so that the
round part shows up in the xy 2D view, regardless of
which view you created it in. This is mostly just a
time saving feature.
Automatic
Infinite Selection In 2D Windows:
When this is enabled, dragging
a selection box over an object or objects will immediately
cause them to be selected [normally
you would need to press Enter].
Selection
Box Selects By Handles Only:
When using a selection box to
select a number of objects, it defaults to selecting
any object the box touches. With this option enabled,
it will only select those objects whose "handles"
[the small "x" at the centre of each object]
are within the selection box.
Grid:
Size:
Grid: Size shows the initial
grid size when you start a new map. The options are
8, 16, 32, 64, 128, and 256 units. You can change the
grid size while editing by pressing [
and ].
Grid:
Intensity:
This is a slide bar from 0 to
100. It sets the intensity (brightness)
of the grid lines.
Grid:
Highlight Every 64 Units:
Grid: Highlight highlights the
grid every 64 units.
Grid:
Highlight Every [xxx] Grid Lines:
This will highlight a grid line
once every [user specified]
lines.
Grid:
Hide Grid Smaller Than 4 Pixels:
If the grid size is smaller
than 4 pixels, it will generally appear as a grey background
instead of a grid, unless zoomed in extremely close.
When enabled, this option turns off the grid when it
gets that small.
Dotted
Grid:
Enabling this option causes
the grid to be displayed as a series of dots, rather
than lines. This may help
if you find that the grid lines blend into your map
lines.
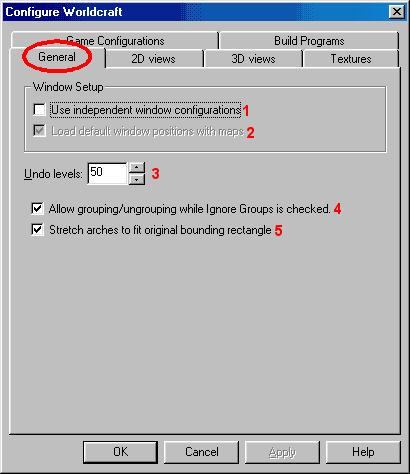
The
3D Options Tab
- [Back
to Contents]

Larger
Image
Hardware
Acceleration:
This will enable WorldCraft
to use hardware acceleration. WorldCraft uses Direct3D
acceleration.
Note that WorldCraft
will not make use of 3DFX voodoo-based video cards for
hardware acceleration purposes, as they do not support
acceleration in multiple windows. A lot of the time
Voodoo based cards just crash WorldCraft when this is
enabled.
Use
Mouselook Navigation:
If this is enabled [it is, by
default] the 3D View mouselook/noclip style of navigation
introduced in version 2.1 will be available. It can
be activated by pressing [lowercase]
z.
Reverse
Mouse Y-Axis:
This option only affects movement
within the 3D window. When it is enabled, the Y-axis
is reversed, resulting in the aircraft style movement
[forward to look down,
backward to look up].
Back
Clipping Plane:
This enables you to drastically
improve your performance in the 3D view. The default
is set at 5000, which, usually includes everything in
your level. Setting this to a lower number will clip
off the back portion, which, since levels are made up
of solid walls, is usually not visible to the player
anyway. This should noticeably speed up the 3D view.
The lowest value for this is 500, which is fine if you're
doing a walk through of an area of the level.
The
Texture Options Tab
-
[Back
to Contents]

Larger
Image
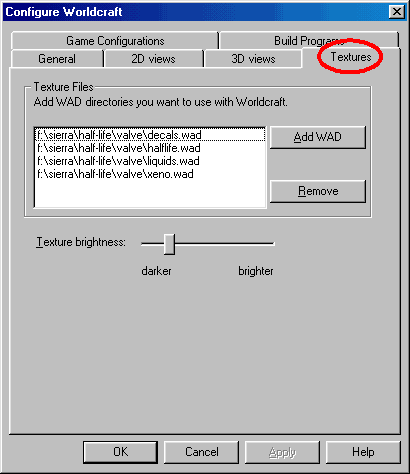
This
is where you add the .wad files to WorldCraft. It will
tell WorldCraft where to get its textures. So you can
implement them in your map. It also allows you to add
.wads that you have created or any wad you want.
Add
WAD:
This will bring up a dialog
box from which you can select a texture WAD file. The
wad files for Half-Life will be in your x:\sierra\half-life\valve
directory, where
x is the drive
letter.
You can see that I have the 4 standard .wads for 'Half-Life'
mapping in my texture list.
If you wish to add support for 'Opposing
Force' textures then add the .wad file to the
list. It will be located in x:\sierra\half-life\gearbox
directory. The
same goes for 'TCF'
[Team Fortress Classic or any other .wad you wish to
use in your map]. Please note that if you want to use
Opposing Force textures in a Half-Life map then your
OpFo .wad needs to be in your x:\sierra\half-life\valve
directory. The same goes for other .wads in different
games.
Remove:
Remove will cause the selected
texture WAD to be removed from the list. This may be
needed if you are running low on memory or using compile
utilities that do not support multiple texture Wads.
Texture
Brightness:
This affects the gamma of the textures. If they appear
light or dark in WorldCraft, you can adjust that here.
The
Game Configurations Options Tab
-
[Back
to Contents]

Larger
Image
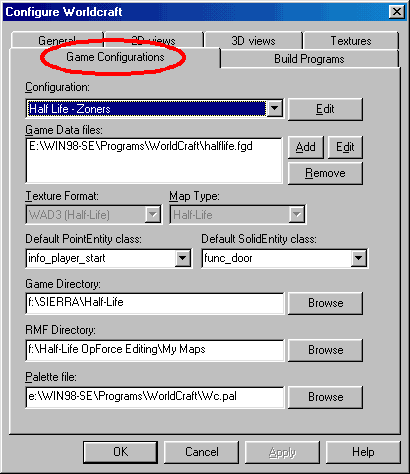
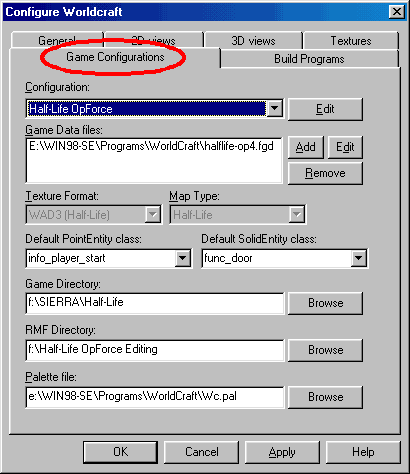
In
the picture above you can see a Blank Configuration
ready for Half-Life.
The
Game Configuration tab is where you setup your, believe
it or not… 'Game Configuration'.
It tells WorldCraft where to look for key
files and locations and also has some timesaving preferences.
Configuration:
Configuration allows you to
setup new configurations profiles for Half-Life. You
can click on the edit button to add,
remove, and copy the game profiles.
Game
Data Files:
You
can specify here which data file WorldCraft will use
for entity support for this game profile. You have the
options of adding, removing, or editing the game file.
WorldCraft
uses FGD files for
to store its entity information, including the entity
names, the flags and keyvalues [variables]
for each entity, and the default
values of the flags and keyvalues.
Texture Format and Map Type:
Don't worry about it not working. For WorldCraft
2.x these options
are locked onto Half-Life.
Default
PointEntity Class:
This allows you to specify the default
point-style entity when you begin a new map.
Default
SolidEntity Class:
This allows you to specify the default
solid-style entity.
Game
Directory:
Specify the game directory here. This is the x:\sierra\half-life
directory where x
is your drive letter.
RMF
Directory:
WorldCraft used .rmf
files to save your maps unless you choose otherwise.
Specify the default map
directory here.
Palette
File:
You must specify the location
of the palette file here. The default wc.pal file [located
in the WorldCraft directory] can be used.
You
can see a typical setup for Half-Life and Opposing Force
in the above screenshots. Make sure your configuration
is setup the same but obviously to your specific machine.
You can't just type in f:\sierra\half-life\valve
and hope it works. The locations have to 'correspond'
to the files our your machine 'not
mine'.
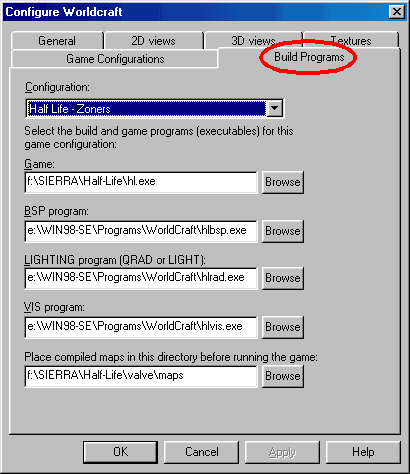
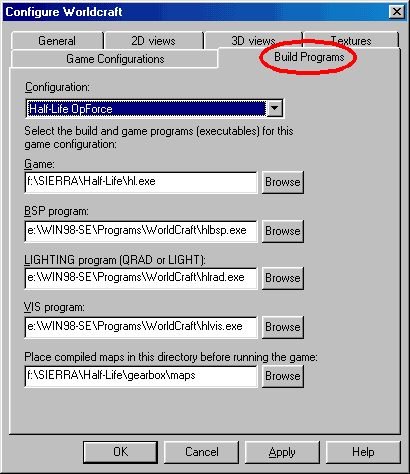
The
Build Programs Options Tab
-
[Back
to Contents]

Larger
Image
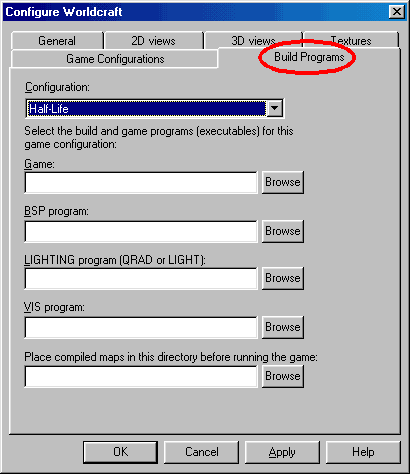
The
Build Programs Option dialog lets you specify all the
executables [the bits
that do the number crunching when you compile your map]
for your game configurations. Just choose a game configuration,
then browse to the game and build executables. It is
important that these settings are correct.
Look at my example setups at the end of this section.
Zoners
Build exe's Are:
hlbsp
hlcsg
hlrad
hlvis
They
should be in your WorldCraft directory or in a subfolder
there. If you don't have them go
get 'em. The standard set of build programs that
come with WorldCraft are OK but Zoners are a
lot better. You will see why later.
You
can see a typical setup for Half-Life and Opposing Force
in the above screenshots. Make sure your configuration
is setup the same but obviously to your specific machine.
You can't just type in f:\sierra\half-life\valve
and hope it works. The locations have to 'correspond'
to the files our your machine not
mine.
That's
it. You are now ready to get
to know WorldCraft. I will be explaining
in detail what the functions of the Build Programs are
soon but for now… be happy with a nearly
ready to use mapping
proggie!
Killa-Kyle
|